The Best Fluffy Pancakes recipe you will fall in love with. Full of tips and tricks to help you make the best pancakes.
Leftover wings always have potential but most reheating methods fail to bring them back properly. The microwave softens the skin until it turns rubbery. The oven can dry them out before they regain any crispness. It’s a common issue in home kitchens especially when the original batch was perfectly cooked.
After testing multiple reheating methods in my own kitchen I’ve found that the air fryer consistently delivers the best results. When used correctly it restores crisp skin while keeping the inside tender and juicy. The circulating hot air reactivates the exterior texture without overcooking the meat.
In this guide, I’ll explain exactly how to reheat chicken wings in an air fryer for the best results. During testing, I focused on texture internal temperature and consistency. Professional techniques were reviewed with input from contributing chefs to ensure the method follows best-practice cooking principles.
You’ll also learn:
- The ideal temperature for reheating wings
- How to reheat sauced wings without burning them
- The right approach for boneless wings
- How to prevent dryness or uneven heating
By the end, you’ll understand the most reliable way to bring leftover wings back to life crisp on the outside, juicy inside and just as satisfying as when they were first served.
My Wing Reheating Revelation: From Soggy Struggles to Crispy Success
Before I refined my method for reheating wings in the air fryer, I tried nearly every common approach. Microwave reheating left the skin soft and damp with steam trapped underneath. Oven reheating often dried out the meat before the exterior had a chance to crisp properly. The results were inconsistent and leftovers rarely matched their original quality.
The shift happened during a late evening of diverse recipe testing. I had a mix of leftover buffalo and garlic parmesan wings and decided to run one more trial in the air fryer. I adjusted the temperature slightly higher than I had in previous tests and paid close attention to spacing in the basket.
The first bite was noticeably different. The skin had regained its crisp texture and the meat underneath stayed tender and juicy. That batch confirmed that the air fryer was not just convenient it was the most reliable way to restore both texture and flavor.
What I Tested to Perfect the Method
After that initial success, I began structured testing to refine the process. I evaluated:
- Sauced, unsauced and breaded wings
- Different temperatures to determine how long to reheat wings without overcooking
- Multiple basket-style air fryer models
- Thicker drumettes versus thinner flats
- Basket placement, spacing and rest time after reheating
Each variable affected the final result in subtle but important ways.
During this refinement phase professional insights from contributing chefs helped validate key principles. Air circulation proved critical for restoring crispness. Moisture management and timing were equally important to prevent dryness while achieving proper exterior texture. These best-practice techniques shaped the final approach outlined in this guide.
Every recommendation that follows comes from repeated real-kitchen recipe testing. The goal was consistency crisp skin, juicy interior and reliable results whether the wings or other meals are plain, breaded or coated in sauce.
Why the Air Fryer Is the Best Way to Reheat Chicken Wings
The air fryer restores crisp skin and juicy meat because it uses rapid circulating dry heat. This removes surface moisture, reactivates browning and heats wings evenly without drying them out something microwaves and ovens struggle to achieve.
For consistent results at home, no other reheating method performs as reliably. After repeated testing with different batches and specific air fryer models, I found that texture recovery depends on three things airflow controlled heat and moisture evaporation. The air fryer handles all three exceptionally well.
Professional insights reviewed with contributing chefs confirmed the same conclusion. When crispness matters convection done correctly makes the difference.
The Science Behind the Crisp: Convection Done Right
An air fryer works through rapid high-speed convection heating. Hot air circulates around the wings from all angles creating concentrated and consistent heat exposure.
A traditional oven uses broader heating zones and slower air movement. As a result, the exterior can dry out before the skin regains crispness.
A microwave works differently. It excites water molecules inside the food which produces steam. That trapped moisture softens the skin and leads to a rubbery texture.
The air fryer avoids this issue because the environment stays dry and constantly moving.
Why This Matters for Texture
Crisp wings rely on a process called the Maillard reaction the browning effect responsible for deep flavor and golden color. For this reaction to occur properly surface moisture must evaporate.
The air fryer accelerates this process by:
- Removing excess surface moisture
- Maintaining steady high circulating heat
- Encouraging exterior browning without overcooking the interior
This is why reheated wings can regain both flavor depth and crunch instead of just becoming hot.
Unmatched Crispiness Every Time
When reheating chicken wings in the air fryer the goal is to restore structure to the skin without drying out the meat. Through testing, I found that proper spacing in the basket allows airflow to crisp the exterior evenly.
The result:
- Lightly blistered, golden-brown skin
- A juicy interior that remains tender
- A crisp bite without additional oil
Even sauced wings respond well. The circulating heat gently evaporates excess moisture while allowing sugars in the sauce to re-caramelize. Instead of turning sticky or soggy the coating tightens and regains texture.
Faster and More Efficient Than the Oven
Another advantage is speed. Most basket-style air fryers preheat within minutes and reheat wings significantly faster than a conventional oven.
During testing, I consistently found that air fryer reheating required less time while delivering better texture recovery. The shorter exposure to heat also reduces the risk of overcooking.
For quick meals or other air fryer snacks that efficiency matters.
Even Heating Without Constant Turning
Uneven reheating is common with leftovers. Ovens may create hot edges and cooler centers. Stovetop methods often require constant monitoring and flipping.
With an air fryer the circulating airflow surrounds each wing. When arranged in a single layer they heat evenly without repeated handling. This makes the process more predictable and far less frustrating.
A Cleaner Reheating Option
For plain or lightly seasoned wings the air fryer also eliminates the need for additional oil. Hot air restores crispness while excess rendered fat drips into the basket below.
The result is a cleaner finish with balanced texture rather than greasy coating.
Why Other Methods Fall Short
Other reheating approaches tend to create one of three problems:
- Microwaves soften the skin and create steam buildup
- Ovens dry out the meat before crispness returns
- Stovetop reheating can lead to uneven browning and excess grease
If the goal is to preserve flavor texture and juiciness in one method, the air fryer consistently delivers the most reliable outcome.
Essential Tools for Air Fryer Wing Reheating Success
Reheating wings in an air fryer is simple but the right tools make a noticeable difference in texture, safety and consistency. Through repeated testing in my own kitchen, I found that a few basic tools consistently improve results.
Professional insights reviewed with contributing chefs also reinforced one key principle airflow, temperature control and safe handling determine whether wings turn crisp or disappointing.
Here’s what actually matters.
1. Air Fryer (Basket or Oven Style)
Your air fryer plays the biggest role in how evenly wings reheat. Both basket-style and oven-style models work well but they perform slightly differently.
Key Features to Consider:
- Capacity: Choose a size that prevents overcrowding. Wings need space for proper air circulation.
- Temperature range: A model that reaches 400°F gives you flexibility for restoring crispness.
- Wattage: 1500 watts or higher generally provides stronger airflow and faster reheating.
In my testing basket-style models often produce slightly better crispness due to concentrated airflow. Oven-style units work well for larger batches and offer more cooking space.
2. Tongs
A sturdy pair of tongs allows you to move or flip wings safely without tearing the skin. Thin silicone-tipped tongs work especially well. They protect the coating while providing a secure grip.
This small detail helps preserve surface texture especially with sauced or breaded wings.
3. Instant-Read Thermometer
For safe reheating, chicken wings must reach an internal temperature of 165°F.
An instant-read thermometer removes guesswork. It ensures wings are fully reheated without being overcooked.
Best practices include:
- Using a digital thermometer for faster readings
- Checking the thickest part of the drumette
- Avoiding contact with bone when measuring
This step improves both food safety and texture control.
4. Oil Sprayer (Optional but Helpful)
For plain or lightly seasoned wings a light mist of neutral oil can enhance browning.
A high-smoke-point oil such as avocado or grapeseed works best. The goal is not to add grease but to support surface crisping.
A reusable spray bottle allows you to apply a very thin layer. During testing, I found this especially helpful for unsauced wings that had dried slightly in the refrigerator.
5. Air Fryer Parchment Liners (Optional)
Parchment liners simplify cleanup especially when reheating heavily sauced wings.
However, they slightly reduce airflow. If maximum crispness is the priority, reheating directly in the basket works better. Liners are most useful when convenience matters more than achieving peak texture.
The Basic Recipe: How to Reheat Chicken Wings in an Air Fryer (Step-by-Step)
To reheat chicken wings in an air fryer preheat to 375-400°F arrange wings in a single layer and cook for 10-15 minutes total flipping halfway through. Ensure the internal temperature reaches 165°F. Rest for 1-2 minutes before serving for maximum crispness.
This is the core method I rely on after testing dozens of batches across different basket-style air fryers. I adjusted timing, spacing and temperature until the results were consistently crisp outside and fully heated inside. The steps below reflect that real kitchen testing supported by professional best-practice techniques reviewed with contributing chefs.
Step 1: Bring Wings to Room Temperature
Remove the wings from the refrigerator and let them sit at room temperature for 15-20 minutes.
Starting with ice-cold wings often leads to over-crisped skin and a lukewarm center. Allowing them to rest briefly promotes even reheating throughout.
Next, pat the wings completely dry with paper towels. Surface moisture prevents proper browning. Removing it helps the skin tighten and crisp once exposed to circulating heat.
Step 2: Preheat the Air Fryer
Preheating ensures immediate surface crisping.
Set your air fryer to 375-400°F (190-200°C) and preheat for 3-5 minutes. Beginning in a fully heated environment prevents the steaming effect that can occur when wings start in a cold basket.
Through testing, this temperature range delivered the best balance between reheating the interior and restoring exterior texture.
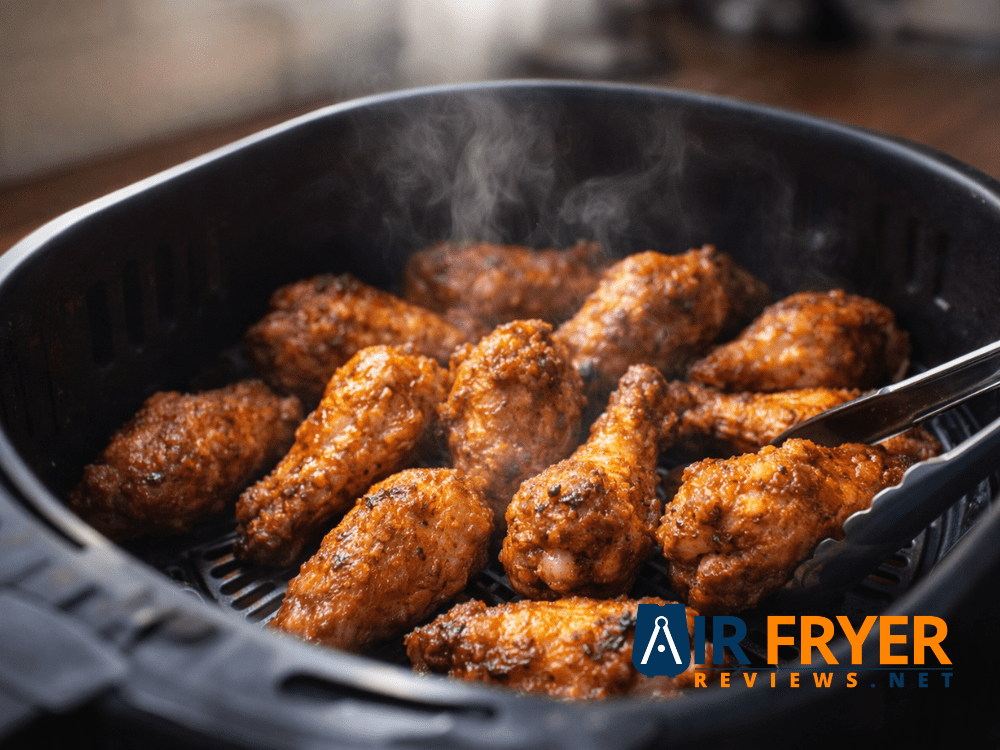
Step 3: Arrange in a Single Layer
Place the wings in the basket in a single layer with space between each piece.
Proper airflow is essential. Overcrowding restricts circulation and leads to uneven reheating. If needed, work in batches rather than stacking.
This step alone significantly improves crispness.
Step 4: Initial Reheat (6-8 Minutes)
Cook for 6-8 minutes to begin warming the interior while restoring the outer texture.
For plain or unsauced wings a very light mist of high-smoke-point oil (such as avocado or grapeseed) can enhance browning. The goal is a thin coating not excess grease.

Step 5: Flip or Shake
At the halfway point:
- Flip bone-in wings gently using tongs
- Shake the basket if reheating boneless wings
This promotes even browning and prevents cold spots.
Continue cooking for an additional 4-7 minutes depending on size and your preferred crisp level.
Step 6: Check for Crispness and Temperature
If extra crispness is needed continue cooking in 1-2 minute increments.
For food safety always confirm the internal temperature reaches 165°F (74°C) using an instant-read thermometer. Insert the probe into the thickest part of the wing without touching the bone.
This ensures the wings are properly reheated without overcooking.
Step 7: Rest Briefly Before Serving
Allow the wings to rest for 1-2 minutes after removing them from the air fryer.
This short rest helps the juices redistribute and allows the skin to firm slightly improving the final texture.
Serve immediately for the best balance of crisp exterior and tender interior.
Detailed Time & Temperature Guide for Different Wing Types
Reheating time depends on three main factors wing size, coating and whether the wings are sauced or plain. During testing, I adjusted temperatures across multiple basket-style air fryers to determine where crispness and even reheating balanced best.
Food Safety Reminder: Chicken wings must reach an internal temperature of 165°F (74°C) before serving.
The chart below provides a reliable starting point. Minor adjustments may be needed depending on your specific air fryer model.
Complete Air Fryer Reheating Chart
| Wing Type | Recommended Temperature | Estimated Time | Key Considerations |
|---|---|---|---|
| Plain Bone-In Wings | 375°F (190°C) | 8-12 minutes | Pat completely dry before reheating. Flip halfway through. A light oil mist can enhance crispness. Best for restoring classic crispy skin. |
| Sauced Bone-In Wings | 350°F (175°C) | 10-14 minutes | Lower temperature prevents burning. Flip halfway. Look for gentle caramelization while ensuring the center reaches 165°F. |
| Boneless Wings / Nuggets | 380°F (195°C) | 6-10 minutes | Shake the basket midway for even browning. Shorter cook time prevents dryness. |
| Crispy or Breaded Wings | 385°F (196°C) | 7-11 minutes | Monitor closely to avoid over-browning. Thawed wings reheat more evenly than frozen. |
| Large or Thick Wings | 360°F (182°C) | 12-16 minutes | Start slightly lower to heat the interior properly. Increase heat for the final 1–2 minutes if additional crispness is needed. |
Professional Notes from Testing
1. Air Fryer Models Vary
Wattage, basket depth and airflow design influence timing. Higher-powered units may cook faster. Always check a few minutes early during your first trial.
2. Always Check the Center
Use an instant-read thermometer and measure the thickest part of the wing without touching the bone. Internal temperature must reach 165°F (74°C) for safe reheating.
3. Adjust for Crispness Preference
If you prefer a deeper crunch extend cooking in 1-2 minute increments. Small increases prevent overcooking.
4. Lower Temperatures for Sauced Wings
Sauces containing sugar caramelize quickly. Reheating too hot can burn the exterior before the inside warms through. Starting lower protects flavor and texture.
Pro Tips for Achieving Perfectly Crispy Reheated Wings
After testing countless batches in my kitchen, I noticed that small adjustments made a significant difference in texture. The following techniques consistently delivered crisp evenly reheated wings. These refinements were also reviewed against professional best-practice principles to ensure reliable results.
1. Avoid Overcrowding
Always arrange wings in a single layer with space between each piece. Proper airflow is the foundation of crispness.
When wings are packed tightly together steam becomes trapped. That moisture softens the skin and prevents even browning. If needed cook in batches rather than stacking.
2. Preheat for Immediate Crisping
Preheating stabilizes the cooking environment before the wings enter the basket.
A fully heated air fryer allows the exterior to begin crisping immediately. Starting cold increases the risk of steaming instead of browning.
3. Flip or Shake Halfway
Midway through reheating:
- Flip bone-in wings gently with tongs
- Shake the basket if reheating boneless wings
This encourages even exposure to circulating heat and prevents soft spots.
4. Use a Light Oil Mist When Needed
Plain or unsauced wings benefit from a very light spray of high-smoke-point oil such as avocado or grapeseed.
The goal is a thin even coating that promotes browning not added grease. During testing this technique noticeably improved exterior texture on refrigerated wings that had dried slightly.
5. Lower the Temperature for Sauced Wings
Buffalo, barbecue and honey-based sauces contain sugars that caramelize quickly.
Using slightly lower heat prevents scorching while still allowing the skin underneath to regain structure. This helps avoid burnt edges before the center is fully reheated.
6. Verify Internal Temperature
Always confirm the thickest part of the wing reaches 165°F (74°C) using an instant-read thermometer.
Insert the probe into the meatiest section without touching the bone. This ensures safe reheating and prevents unnecessary overcooking.
7. Let the Wings Rest Briefly
After removing the wings from the air fryer allow them to rest for 1-2 minutes.
This short pause helps juices redistribute and allows the skin to firm slightly. The result is a cleaner more satisfying bite.
8. Adjust Based on Wing Type
Not all chicken dishes reheat the same way:
- Boneless pieces warm faster and can dry out if overcooked
- Thick bone-in chicken may require slightly longer reheating
- Breaded wings brown more quickly and should be monitored closely
Understanding these differences helps fine-tune timing for consistent results.
9. Use a Two-Stage Approach for Large Batches
For oversized chicken cuts or full baskets begin at a slightly lower temperature to warm the interior gradually. Increase the heat during the final minutes to crisp the exterior.
This method prevents over-browning while ensuring the center heats through.
10. Keep the Basket Clean
A clean air fryer basket improves airflow and prevents sticking. Built-up residue can interfere with circulation and affect flavor.
Regular cleaning helps maintain consistent performance.
Troubleshooting Common Reheating Problems
Even when you follow the core method small variables can affect the final result. Wing thickness, sauce type and air fryer power all play a role. The issues below are the most common ones I’ve seen during testing along with simple corrections that consistently fix them.
1. Soggy Wings
Common Causes:
- Wings placed too close together
- Air fryer not preheated
- Temperature too low to trigger browning
How to Fix It:
- Arrange wings in a single layer with visible space between each piece
- Always preheat before adding the wings
- Increase the temperature slightly (5-10°F) if browning isn’t starting quickly
Excess surface moisture is often the main culprit. Patting the wings dry before reheating also improves crispness significantly.
2. Dry or Rubbery Wings
Common Causes:
- Reheating too long
- Temperature set too high
- Skipping the brief rest period
How to Fix It:
- Reduce cooking time by 1-2 minutes
- Lower the temperature slightly
- Use an instant-read thermometer to avoid overshooting 165°F
- Let the wings rest for 1-2 minutes after reheating
Overexposure to heat removes moisture from the meat. Controlled timing and a short rest help preserve tenderness while keeping the skin crisp.
3. Unevenly Heated Wings
Common Causes:
- Wings not flipped or shaken
- Basket overcrowded
- Inconsistent spacing
How to Fix It:
- Flip bone-in wings halfway through
- Shake the basket if reheating boneless pieces
- Keep wings in a single layer
- Reposition pieces if one area is browning faster
Good airflow is what makes air fryer reheating work. If circulation is blocked uneven heating follows.
4. Burnt Sauce
Common Causes:
- Temperature too high for sugary sauces
- Wings left in too long during final crisping
How to Fix It:
- Reduce temperature by 15-25°F
- Monitor closely during the final minutes
- For very sweet sauces consider adding a small amount of fresh sauce after reheating instead of cooking it further
Sauces with sugar caramelize quickly. Lower heat protects flavor while still warming the interior properly.
The ‘Crispness Factor’ Visual Guide: From Soft to Super Crunch
One of the biggest advantages of using an air fryer is texture control. Small adjustments in time and temperature noticeably change the final result. After repeated testing, I found that crispness falls into three clear visual stages.
Use the cues below to identify your preferred finish and adjust confidently.

11. Light Golden (Gently Crisped)
Visual Cues:
- Pale golden color
- Slightly tightened skin
- Soft bite with minimal crunch
- Very little browning on edges
How to Achieve It:
- Reheat at 375°F for about 6-7 minutes
- Avoid additional oil
- Remove as soon as the exterior firms slightly
This level works well if you prefer wings warmed through with only a subtle crisp finish.
2. Golden Brown (Classic Crisp)
Visual Cues:
- Even golden-brown surface
- Noticeable crunch when pressed
- Firm skin without dark spots
- Light browning along edges
How to Achieve It:
- Reheat at 375-400°F for 10-12 minutes total
- Flip or shake halfway through
- Let rest for 1-2 minutes before serving
This is the texture most people expect crisp exterior with a juicy interior. In testing this range consistently delivered the best balance.
3. Deep Golden Brown (Extra Crisp)
Visual Cues:
- Rich golden-brown color
- Small blistered spots on the surface
- Pronounced crunch especially on edges
- Crisp structure without burnt areas
How to Achieve It:
- Add 1-3 extra minutes at the end
- Increase temperature slightly (5-10°F) if needed
- Monitor closely especially with sauced wings
This level works particularly well for plain or breaded wings where deeper browning enhances texture.
How to Adjust for Your Preferred Crispness
If You Prefer a Lighter Finish
- Lower temperature by 10-15°F
- Shorten cooking time
- Skip oil spritzing
If You Prefer Classic Crispness
- Maintain 375-400°F
- Flip halfway
- Use a light oil mist on plain wings if needed
If You Prefer Extra Crunch
- Extend cooking in 1-2 minute increments
- Monitor closely to prevent over-browning
- Allow a brief rest to let the exterior fully set
Food Safety First: Reheating Chicken Wings Safely
Restoring crispness matters but safety comes first. Proper storage, handling and temperature control ensure reheated wings are both enjoyable and safe to eat. These guidelines align with recommendations from the USDA Food Safety and Inspection Service and standard culinary best practices.
The 165°F (74°C) Rule – Why It Matters
Chicken wings must reach an internal temperature of 165°F (74°C) when reheated.
According to the USDA this temperature eliminates harmful bacteria such as Salmonella and Campylobacter that may be present in poultry.
This standard applies to both initial cooking and reheating. Even if the wings were fully cooked before refrigeration they must return to 165°F to be considered safe.
How to Use an Instant-Read Thermometer Properly
An instant-read thermometer removes guesswork and ensures accuracy.
For a precise reading:
- Insert the probe into the thickest part of the wing
- Avoid touching the bone, which can produce a falsely high reading
- Check more than one piece when reheating large batches
If your thermometer includes a calibration feature test it occasionally to maintain accuracy. A reliable reading ensures safe reheating without overcooking.
Safe Storage Before Reheating
Food safety begins before the air fryer is turned on.
Refrigeration Guidelines
- Store cooked wings in an airtight container
- Refrigerate within 2 hours of cooking
- Consume within 3-4 days
Proper refrigeration slows bacterial growth and preserves both safety and texture.
Freezing Guidelines
For longer storage:
- Use airtight packaging or freezer-safe bags
- Remove excess air before sealing
- Freeze for up to 3-4 months for best quality
For even reheating, thaw frozen wings overnight in the refrigerator. Thawing at room temperature is not recommended.
Comparison: Air Fryer vs. Other Reheating Methods (Oven, Microwave)
When deciding how to reheat chicken wings the method you choose directly affects texture, moisture retention and consistency. After testing all three approaches in my kitchen the differences were clear especially when crispness was the goal.
Below is a practical comparison based on real-world results.

Microwave
Pros
- Fastest reheating method
- No preheating required
- Convenient for small portions
Cons
- Traps steam under the skin
- Produces soft or rubbery texture
- Often creates cold spots
- Performs poorly with sauced or breaded wings
Microwaves heat water molecules inside the food. That internal steam softens the exterior instead of restoring crispness. While convenient in urgent situations the texture rarely resembles freshly cooked wings.
Conventional Oven
Pros
- Handles large batches well
- More even heating than a microwave
- Lower risk of rubbery texture
Cons
- Long preheating time
- Slower overall process
- Wings can dry out before crisping
- Broiling improves crispness but increases risk of burning
The oven performs better than a microwave but still struggles to balance interior warmth with exterior crispness. By the time the skin firms up the meat may begin to dry out.
The Air Fryer Advantage
The air fryer combines speed with superior texture restoration. Through repeated testing it consistently delivered the closest results to freshly cooked wings.
Why It Works
- Rapid circulating hot air removes surface moisture
- Short preheat time improves efficiency
- Even airflow reduces cold spots
- Exterior crisps while the interior remains juicy
- Works well for plain, sauced, boneless or breaded wings
Because it controls airflow and evaporation more effectively the air fryer restores structure instead of steaming the skin. The result is balanced reheating crisp outside tender inside.
Final Verdict
If speed is your only concern the microwave is the quickest option.
If reheating a large tray at once the oven is manageable.
However, for the best balance of texture, moisture control and consistency the air fryer remains the most reliable method.
Storing Leftover Wings for Future Air Frying
How you store leftover wings directly affects how well they reheat later. Proper storage preserves moisture balance, protects texture and makes it much easier to restore crispness in the air fryer.
These best practices align with general food safety recommendations and practical kitchen testing.
Refrigeration Best Practices
If you plan to reheat within a few days refrigeration is the best option.
Follow these steps:
- Store wings in airtight containers to prevent moisture loss
- Place them in the coldest part of the refrigerator (usually near the back)
- Refrigerate within 2 hours of cooking
- Consume within 3-4 days
Keeping wings sealed properly prevents them from drying out or absorbing odors from other foods. When stored correctly the skin and meat maintain better structure for reheating.
Freezing for Longer Storage
If you do not plan to use the wings within a few days freezing helps preserve quality.
For best results:
- Wrap wings individually or in small portions using plastic wrap or foil
- Place wrapped wings in freezer-safe bags or airtight containers
- Remove as much air as possible before sealing
- Label with the storage date
Cooked wings maintain good quality in the freezer for 3-4 months. Proper wrapping prevents freezer burn and moisture loss.
Thawing for Better Reheating Results
While it is possible to reheat wings from frozen thawing produces more even heating and better crispness.
Recommended Method:
- Thaw overnight in the refrigerator
- Keep wings covered during thawing
- Pat dry before reheating
Slow thawing prevents excess surface moisture which helps the skin crisp properly once reheated.
Frequently Asked Questions (FAQs)
Yes, frozen wings can be reheated directly in the air fryer.
For best results use a two-stage method:
- Start at 300-320°F for several minutes to warm the center gradually
- Increase to 375-390°F to restore crispness
This approach reduces the risk of burnt edges while ensuring the interior heats evenly. Always confirm the internal temperature reaches 165°F (74°C) before serving.
Follow the single-layer rule.
Wings should be arranged with visible space between each piece to allow proper airflow. Overcrowding traps steam and prevents crisping.
As a general guide:
- Basket-style air fryers typically hold 6-10 wings per batch
- Oven-style models can accommodate slightly more
If needed, cook in batches for consistent results.
Usually, no.
Most sauces contain enough fat to support browning. Adding extra oil can increase the risk of burning especially with sugary sauces like barbecue or honey-based varieties.
If the wings appear dry apply only a very light mist of high-smoke-point oil and monitor closely.
Use a slightly lower temperature and reduce the reheating time.
This warms the wings without over-darkening or drying the exterior. Lower settings are especially helpful for breaded or double-fried wings.
Only if they are similar in size and preparation style.
Boneless pieces, thick drumettes, breaded wings and heavily sauced wings reheat at different rates. If the batch includes mixed types consider reheating separately or adjust timing carefully to ensure even results.
Conclusion: Reliable Crispness Every Time
The air fryer remains the most dependable method for restoring leftover wings. Its rapid circulating heat revives the exterior while maintaining a juicy interior a balance that microwaves and ovens rarely achieve.
Throughout this guide, I’ve shared techniques refined through hands-on testing along with food safety standards and practical adjustments for different wing types. When airflow spacing, temperature and timing are controlled properly leftovers regain both texture and flavor.
Apply these methods monitor temperature carefully and adjust for your preferred crispness level. With the right approach reheated wings can be just as satisfying as when they were first served.

Air Fryer Reheated Wings (Quick Reference)
Course: Reheat Chicken WingsServings
Varies (use single-layer batches)
servingsPrep time
3
minutesCooking time
8
minutesCalories
85-110 kcal
kcalPurpose: A quick, print-friendly summary for reheating chicken wings in the air fryer.
Note: Calorie values are estimated ranges. Actual numbers vary based on wing size, breading, sauce, added oil and brand. For precise tracking, weigh your wings and use a nutrition calculator or package label.
Temperature: 375-400°F (190-200°C) typical range
Ingredients / Equipment
Leftover chicken wings (any style) as desired
Neutral, high-smoke-point oil (optional avocado or grapeseed), light mist only
Instant-read thermometer (recommended) ensure internal temp reaches 165°F (74°C)
Tongs
Clean air fryer basket
Parchment liners (optional)
Quick Steps
- Bring to room temperature:
Let wings sit out for 15-20 minutes. Pat completely dry. - Preheat:
Set air fryer to 375-400°F (190-200°C). - Arrange properly:
Place wings in a single layer. Do not overcrowd. - Cook:
Reheat for 8-15 minutes total flipping bone-in wings or shaking boneless pieces halfway through. - Finish:
Continue in 1-2 minute increments if needed until wings reach 165°F (74°C) and desired crispness. - Rest:
Allow to rest for 1-2 minutes before serving. - For sauced wings: Start around 350°F and monitor closely to prevent burning.
Handy Notes & Tips
- Always confirm the internal temperature reaches 165°F (74°C) for safe reheating.
- Refrigerate leftovers within 2 hours and consume within 3-4 days.
- For frozen wings thaw overnight in the refrigerator for better crispness.
- If tracking calories precisely weigh wings after cooking and log by type (plain, sauced or breaded).
- A light oil spritz adds minimal calories heavier oil use increases totals.
Calories – Estimated Nutrition Guide
Important: These are approximate ranges. Use the lower end for smaller, lean wings and the higher end for large, breaded or heavily sauced portions.
| Wing Type | Calories per Wing (est.) | 4 Wings (Appetizer) | 8 Wings (Small Meal) | 10 Wings (Party Portion) |
|---|---|---|---|---|
| Plain, skin-on (no breading, no sauce) | 85-110 kcal | 340-440 kcal | 680-880 kcal | 850-1,100 kcal |
| Sauced (Buffalo, BBQ, moderate coating) | 110-150 kcal | 440-600 kcal | 880-1,200 kcal | 1,100-1,500 kcal |
| Breaded / Crispy | 160-220 kcal | 640-880 kcal | 1,280-1,760 kcal | 1,600-2,200 kcal |
| Boneless (breaded style) | 140-200 kcal | 560-800 kcal | 1,120-1,600 kcal | 1,400-2,000 kcal |
How to Use These Numbers
- Multiply the per-wing estimate by your portion size for basic meal planning.
- If adding sauce after reheating include an additional ~10-40 kcal per wing depending on quantity.
- Keep oil applications minimal to maintain lower calorie totals.
