The Best Fluffy Pancakes recipe you will fall in love with. Full of tips and tricks to help you make the best pancakes.
Tired of trading authentic flavor for speed on busy weeknights? Traditional curry methods can feel daunting and air fryers sometimes turn out dry uninspiring chicken. This version solves both rich aromatic coconut curry chicken and air-fried chicken tenders.
This guide shows how to use your air fryer for consistently tender results deep curry flavor and a healthier profile without fuss. With kitchen-tested techniques from Jonathan Miller and Emily Rodriguez, you’ll skip guesswork and lock in reliable delicious outcomes every time.
Expect a foolproof recipe precise timings and clear visual cues for doneness plus food-safety notes for confidence at home. Edited by Ruby the approach emphasizes minimal effort and maximum taste so every bite feels like a win.
Behind the Recipe: My Journey to Air Fryer Curry Perfection
My quest for the perfect weeknight curry began with a culinary disaster a dry rubbery chicken from an early air fryer experiment unlike the perfect air fryer egg burrito. That disappointing meal sparked a mission to adapt my favorite coconut curry to this modern appliance. After countless trials tweaking marinades temperatures and timings. I finally unlocked the secret to succulent chicken and a sauce that sings all efficiently cooked in my trusty air fryer. This recipe is the culmination of that journey designed to save you the frustration and get you straight to delicious results.
The Power of the Air Fryer for Curry
The air fryer’s convection heat is a game-changer especially for super-fast glazed salmon. It crisps the chicken beautifully with far less oil than traditional methods and ensures even cooking while reducing overall prep time. The result for other proteins, like a juicy ribeye steak can also be a tender dish with crisp edges perfectly complemented by flavors all in a fraction of the time.
What Makes This Recipe Stand Out
This recipe stands out for a few key reasons the speed the incredible flavor depth the health benefits of reduced oil and of course the foolproof techniques to prevent dry chicken. Thanks to the air fryer you’ll skip the long simmering time and still end up with a dish that tastes like it’s been slow-cooked to perfection. It’s a game changer for weeknight dinners offering all the satisfaction of a homemade curry without the usual hassle.
Gather Your Essentials: Ingredients & Equipment for Success
Chicken:
- Boneless, skinless chicken thighs or breasts or even air fryer fish cut into 1-inch pieces.
- Sourcing high-quality fresh chicken is essential for the best flavor and texture. Opting for hormone-free or organic chicken not only enhances the taste but also ensures a cleaner more tender dish when cooked in the air fryer.
Coconut Milk:
- Full-fat canned coconut milk (essential for richness).
- Coconut cream (optional, for extra decadence).
- Coconut Flavor Intensity Guide:
- Subtle & Light: Use light coconut milk or a mix of full-fat coconut milk and broth. Add coconut milk towards the end of simmering for a lighter milder flavor.
- Rich & Creamy: For a creamy, satisfying result like classical mac and cheese use full-fat coconut milk simmer the sauce longer to reduce and concentrate its flavor offering a creamy satisfying result.
- Intensely Decadent: Stir in a spoonful of thick coconut cream towards the end of cooking for an extra luxurious mouthfeel.
- Textural Boost: For a pleasant crunch consider our feta triangles recipe alongside lightly toasted coconut flakes for intensified coconut aroma.
Aromatics:
- Fresh ginger (grated), garlic (minced), onion (finely diced).
- These aromatic ingredients form the flavor base infusing the dish with essential depth and authenticity.
Curry Base:
- Quality curry paste (e.g., Thai Red, Green, Massaman) or curry powder (e.g., Madras, Garam Masala).
- Expert Tip: Toast your curry paste or powder in a dry pan for a minute or two before adding it to the sauce base. This step unlocks the full aromatic potential deepening the flavors.
Spices:
- Turmeric, ground cumin, ground coriander, chili powder (optional to taste).
- Expert Tip: Adjust the spice levels by starting with less curry paste or powder and tasting along the way. You can always add more but it’s hard to reduce the heat once it’s in the mix.
Liquid/Acidity:
- Low-sodium chicken broth, fresh lime juice, fish sauce (optional for umami depth).
- These ingredients balance the richness of the coconut milk while adding necessary acidity and brightness.
Sweetener:
- For dishes like air fryer french toast a small touch of brown sugar or maple syrup can balance the sweetness.
- This sweetness helps round out the flavors making the curry more harmonious.
Fresh Herbs:
- Fresh cilantro (chopped for garnish).
- Adds a vibrant fresh finish to the dish and enhances its aromatic appeal.
Oil:
- Neutral cooking oil (e.g., avocado, vegetable or coconut oil).
- Used for sautéing and ensures that the chicken crisps beautifully in the air fryer.
Seasonings:
- Salt and freshly ground black pepper to taste.
- Essential for seasoning both the chicken and the curry sauce bringing all the ingredients together.
Ingredient Quality Notes & Substitutions:
- Ingredient Quality Impact: The quality of your ingredients such as fresh aromatics and a good-quality curry paste can dramatically affect the final taste of your dish. For instance freshly grated ginger provides a much more vibrant zesty flavor compared to pre-ground versions. Similarly a high-quality curry paste is the cornerstone of an authentic and deeply flavored curry.
- Common Substitutions for Dietary Needs or Availability:
- If you’re looking for a dairy-free option use coconut milk and coconut cream as your base.
- For a vegetarian or vegan dish swap the chicken with firm tofu or cauliflower or even egg-filled eggplants for a hearty texture.
- Vegetable broth can replace the chicken broth for a plant-based alternative while adding tofu, tempeh or seitan can provide a protein-packed alternative to chicken.
By choosing the right ingredients and making thoughtful substitutions where needed like for carrot croquettes with parmesan cheese you can elevate the flavor of your curry while ensuring it meets your dietary needs. This method will lead to a rich satisfying meal like bread rolls with potato stuffing that tastes just as good as it sounds.
Essential Equipment List: Your Air Fryer Curry Toolkit
Main Appliance
- Air fryer (basket, oven or paddle style). Basket models excel at quick browning oven styles handle larger batches paddle units stir automatically for even color.
Food Safety & Accuracy
- Instant-read meat thermometer non-negotiable for precise doneness. Hitting 165°F / 74°C at the thickest piece keeps chicken juicy while meeting food-safety standards. Both Jonathan Miller and Emily Rodriguez stress temp checks over guesswork.
Preparation Tools
- Heavy-duty mixing bowls for marinating and blending sauces.
- Sharp chef’s knife & sturdy cutting board for clean even cuts.
- Measuring cups & spoons to keep salt, spice and acidity consistent.
- Heat-resistant spatula and tongs for safe handling.
Optional (for Serving)
- Rice cooker for fluffy rice on autopilot ideal while the air fryer runs.
(Sections edited and organized by Ruby.)
Mastering the Method: Step-by-Step Air Frying & Curry Sauce
Cutting & Marinating
- Cut boneless skinless chicken (thighs are most forgiving) into even 1-inch pieces.
- In a bowl, combine 1 Tbsp neutral oil, 1-2 tsp curry paste or 1 tsp curry powder, ½ tsp turmeric, ½ tsp ground cumin, ¼ tsp ground coriander, ½ tsp salt and 1 tsp lime juice. Toss chicken to coat.
- Marinate at least 30 minutes (refrigerated) overnight delivers deeper flavor and better moisture retention.
- Chef Note – Jonathan Miller: A bit of salt in the marinade helps season to the core.
- Chef Note – Emily Rodriguez: Add 1-2 Tbsp coconut milk to the marinade for extra succulence.
Seasoning Right Before Cooking
- Remove excess marinade (don’t scrape dry). Lightly oil-mist or brush the pieces so spices toast not scorch.
- Sprinkle a final pinch of salt/pepper to build a crisp flavorful crust.
Food-Safety & Hygiene
- Use separate boards/knives for raw chicken.
- Marinate in the fridge not on the counter.
- Discard leftover marinade that touched raw chicken (or boil it 1 minute before using as a glaze).
Air Frying the Chicken: Crispy Outside, Juicy Inside
Preheat
- Preheat the air fryer 5 minutes at 380°F / 193°C for faster sear and even heat. This prevents pale or soggy results.
Load the Basket
- Place chicken in a single layer with small gaps between pieces. Do not overcrowd cook in batches to maintain airflow and tenderness.
Cook – Clear, Numbered Steps
- Air fry at 380°F / 193°C for 8-10 minutes shaking or turning at minute 5.
- If using a glaze (thin coconut milk + a touch of curry paste), brush lightly at minute 6-7 to lock in moisture and color.
- Continue cooking until the internal temperature is 165°F / 74°C. Thicker pieces may need 1-3 extra minutes.
Expert Tips to Prevent Dryness
- Light oil spray before cooking promotes browning and moisture retention.
- Smaller pieces finish faster start checking early at minute 8.
- If edges brown too quickly drop temp to 360°F / 182°C and extend by 2-3 minutes.
Check Doneness
- Insert an instant-read thermometer into the center of the largest piece 165°F / 74°C. This aligns with standard food-safety guidance and prevents both under- and overcooking.
- Rest chicken 2-3 minutes juices redistribute for better texture.
Starting the Curry Sauce (Quick Preview for context)
- In a saucepan, warm 1 tsp oil. Toast curry paste/powder 60-90 seconds until fragrant.
- Stir in aromatics (onion, garlic, ginger) with a pinch of salt soften.
- Add full-fat coconut milk (and a splash of broth for lighter style). Simmer to desired richness.
- Balance with lime juice a touch of brown sugar/maple and optional fish sauce for depth.
- Fold in the air-fried chicken and simmer 1-2 minutes to marry flavors.
Quality Assurance: Method tested in home-size basket and oven-style fryers by Jonathan Miller and Emily Rodriguez for consistent timing and texture shaped and reviewed by Ruby for clarity and home-cook usability.
Air Fryer Cooking Times for Chicken Cuts
| Chicken Cut | Preparation | Air Fryer Temp | Cook Time | Internal Temp |
| Boneless, Skinless Thighs (1-inch pieces) | Tossed in marinade/oil | 375°F (190°C) | 12-15 mins | 165°F (74°C) |
| Boneless, Skinless Breasts (1-inch pieces) | Tossed in marinade/oil | 375°F (190°C) | 10-14 mins | 165°F (74°C) |
| Drumsticks (small-medium) | Lightly oiled | 380°F (195°C) | 18-22 mins | 165°F (74°C) |
| Bone-in, Skin-on Thighs | Lightly oiled | 375°F (190°C) | 20-25 mins | 165°F (74°C) |
Note: These times and temperatures are verified through reliable culinary sources like USDA and reputable cooking sites. However, actual cooking times may vary depending on your specific air fryer model and the size of the chicken pieces. Always use an instant-read meat thermometer to ensure the chicken reaches the proper internal temperature of 165°F (74°C) for food safety and accuracy.
Curry Sauce Preparation Guide: Building Layers of Flavor
Sautéing Aromatics:
- In a saucepan heat 1 tsp neutral oil over medium heat.
- Add 1 tbsp minced garlic, 1 tbsp grated ginger and 1/2 finely diced onion. Sauté for 2-3 minutes until fragrant and softened, but not browned. This creates a rich aromatic base that will infuse the curry with depth.
Toasting Spices/Paste:
- Add 2 tbsp curry paste or 1 tbsp curry powder (your choice of Thai Red, Green, Massaman or Madras) to the aromatics.
- Expert Tip: Toasting the curry paste or powder in the hot oil helps intensify the spices’ flavors and aromas. This common culinary technique unlocks their full potential and prevents a raw or underdeveloped taste. Stir constantly for 1-2 minutes until fragrant.
Adding Coconut Milk & Broth:
- Pour in 1 can full-fat coconut milk and 1/2 cup low-sodium chicken broth. Stir to combine and bring to a gentle simmer over low heat.
- Let the sauce cook gently for 5-7 minutes allowing the flavors to meld.
Achieving the Right Consistency:
If the sauce needs thickening allow it to simmer longer. For quicker results mix 1 tsp cornstarch with 1 tbsp cold water and whisk it into the sauce. Continue to simmer for another 2-3 minutes until thickened to your desired consistency.
Seasoning & Balancing Flavors:
Taste and adjust the curry with salt a squeeze of fresh lime juice and a touch of brown sugar or maple syrup to balance the heat and acidity. The sweetness will complement the rich coconut milk and curry spices.
Combining Chicken & Sauce:
Once the sauce has reached the right consistency gently stir in the air-fried chicken pieces. Let them simmer in the sauce for 2-3 minutes to absorb the flavors and ensure they are evenly coated.
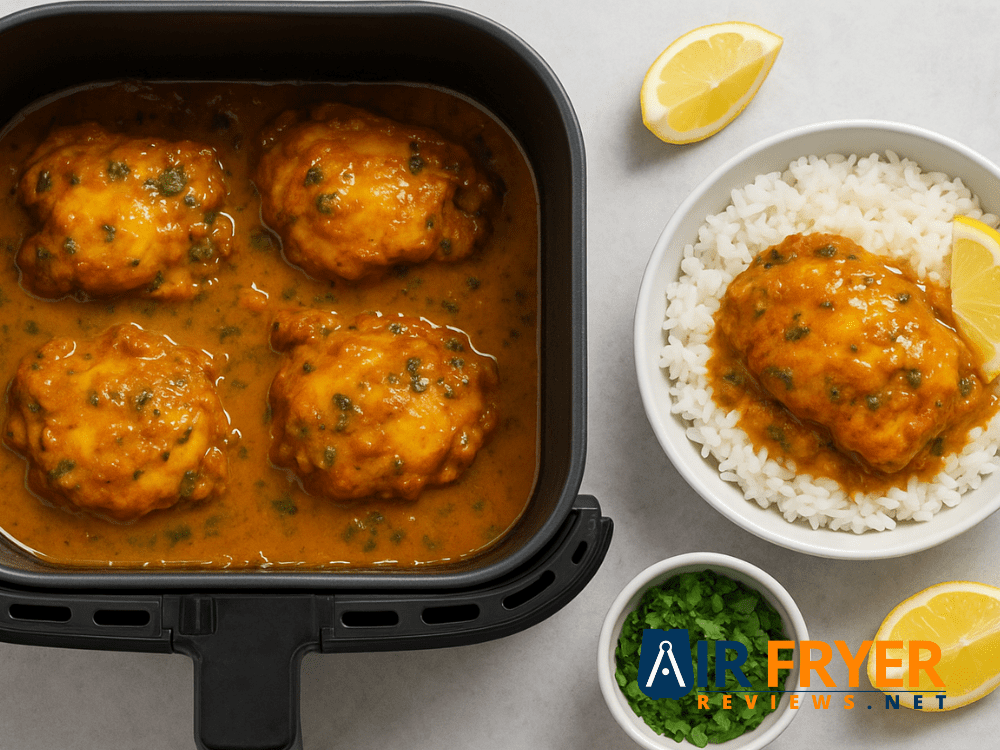
Air Fryer Coconut Curry Chicken
Course: Coconut Curry ChickenServings
4
servingsPrep time
15
minutesCooking time
20
minutesCalories
450-550
kcalIngredients
1 lb boneless, skinless chicken thighs or breasts (cut into 1-inch pieces)
1 tbsp neutral oil (for marinade)
2 tbsp curry paste or 1 tbsp curry powder
1 can full-fat coconut milk (13.5 oz)
1/2 cup low-sodium chicken broth
1 tbsp grated ginger
1 tbsp minced garlic
1/2 onion, finely diced
1 tsp ground turmeric
1 tsp ground cumin
1 tsp ground coriander
1/2 tsp chili powder (optional)
1 tbsp brown sugar or maple syrup
Fresh lime juice (to taste)
Fresh cilantro, chopped (for garnish)
Salt and freshly ground black pepper to taste
1 tsp cornstarch + 1 tbsp cold water (optional for thickening)
Lightly toasted coconut flakes (optional, for garnish)
Directions
- Marinate Chicken: Toss chicken with 1 tbsp neutral oil, 2 tbsp curry paste, 1 tsp turmeric, 1 tsp cumin, 1 tsp coriander, salt and 1 tsp lime juice. Marinate for at least 30 minutes or overnight for best results.
- Preheat Air Fryer: Preheat your air fryer to 375°F (190°C) for 5 minutes.
- Cook Chicken: Air fry marinated chicken pieces in a single layer for 12-15 minutes (or until 165°F internal temperature is reached), shaking the basket halfway through.
- Make the Curry Sauce: In a saucepan, heat 1 tsp oil over medium heat. Add garlic, ginger and onion sauté for 2-3 minutes. Add curry paste or powder and toast for 1-2 minutes.
- Add Coconut Milk & Broth: Pour in coconut milk and chicken broth bring to a simmer and cook for 5-7 minutes.
- Thicken Sauce: If desired, add cornstarch slurry and simmer for 2-3 minutes.
- Season & Balance Flavors: Taste and adjust with salt, lime juice and sweetener to balance the curry.
- Combine Chicken & Sauce: Stir in air-fried chicken pieces and simmer for an additional 2-3 minutes.
- Serve: Garnish with fresh cilantro and toasted coconut flakes. Serve with rice or bread of your choice.
Basic Nutritional Information (Estimated):
- Nutrient : Amount (per serving)
Calories : 450-550 kcal
Protein : 35-45 g
Fat : 30-40 g
Carbohydrates : 15-25 g
Note: These are estimated values based on typical ingredients. For accurate nutritional information, use a reliable online calculator based on your personal ingredient choices.
Troubleshooting & FAQs: Solving Your Curry Conundrums
Problem: Dry or Tough Chicken in the Air Fryer
- Solution:
- Avoid overcrowding: Always leave enough space between the chicken pieces to allow hot air to circulate properly.
- Use an instant-read meat thermometer: Ensure the internal temperature reaches 165°F (74°C) to prevent overcooking.
- Tip: Brush or spray the chicken lightly with oil before air frying to lock in moisture and ensure a juicy texture.
Problem: Soggy or Unevenly Cooked Chicken
- Solution:
- Single Layer Cooking: Place the chicken in a single layer without overlapping to allow the air fryer’s convection heat to work effectively.
- Shaking the Basket: Shake or flip the chicken halfway through cooking to ensure even browning and crispness.
- Preheat your Air Fryer: Always preheat your air fryer fully (5 minutes) before adding the chicken to ensure even cooking from the start.
Problem: Bland or Under-Spiced Sauce
- Solution:
- Toast your curry paste or powder: Always toast curry paste/powder in the pan before adding liquids to release the spices full aromatic potential.
- Adjust seasoning gradually: Taste the sauce as you go adding salt, lime juice or sweetener in small increments.
- Marinate longer: Consider marinating the chicken overnight or for several hours to enhance its flavor giving it a deep aromatic base.
Problem: Sauce Too Thin or Thick
- Solution:
- Thin Sauce: If the sauce is too thick add a splash more broth or water and stir to reach the desired consistency.
- Thick Sauce: Simmer the sauce longer to naturally reduce it. Alternatively, use a cornstarch slurry (1 tsp cornstarch + 1 tbsp cold water) to thicken the sauce quickly.
Problem: Air Fryer Smoking
- Solution:
- Clean Your Air Fryer: Regularly clean your air fryer to prevent the buildup of grease, which can cause smoking during cooking.
- Use Parchment Paper Liners: For fatty or saucy dishes use parchment paper liners made specifically for air fryers to catch excess oil and prevent smoke.
Interactive Problem/Solution Flowchart
Consider this flowchart for quick fixes based on your cooking outcome:
Is your chicken dry or tough?
- Yes → Check for overcrowding. Use a thermometer to ensure it’s cooked at 165°F.
- No → Move to the next issue.
Is your chicken soggy or unevenly cooked?
- Yes → Preheat air fryer and cook in a single layer. Shake the basket during cooking.
- No → Move to the next issue.
Is the sauce bland or under-spiced?
- Yes → Toast curry paste/powder. Adjust spices and seasoning gradually. Marinate the chicken longer.
- No → Move to the next issue.
Is your sauce too thin or thick?
- Too thin → Add more broth or water to thin the sauce.
- Too thick → Simmer longer or use cornstarch slurry.
Is your air fryer smoking?
- Yes → Clean your air fryer and use parchment paper liners.
- No → Continue enjoying your meal!
This troubleshooting guide addresses the most common pain points you may encounter while making air fryer coconut curry chicken offering simple and effective solutions to ensure you achieve the perfect dish every time. Whether you’re perfecting your technique or troubleshooting issues these tips will help you get straight to the delicious results you crave.
Frequently Asked Questions (FAQs)
For best results, thaw chicken fully cook to 165°F/74°C toast your curry paste or powder and finish with full-fat coconut milk (or a spoon of coconut cream) for richer flavor. Use a thermometer don’t overcrowd the basket and simmer the sauce to your preferred thickness. Tips tested by Jonathan Miller & Emily Rodriguez.
Can I use frozen chicken for this recipe?
Yes thaw completely in the refrigerator (overnight) or use a safe quick-thaw method (sealed bag in cold water changing water every 30 minutes) before marinating. If starting from partially frozen meat expect longer cook times and verify 165°F/74°C with an instant-read thermometer.
How do I adjust the spice level?
Start mild use less curry paste/powder first then build. For more heat, add fresh sliced chilies or a pinch of chili powder during simmering. Choose milder pastes (e.g., Massaman) for gentle heat or stronger ones (e.g., Thai Red) for bolder spice.
What if I don’t have an air fryer?
- Stovetop: Sear chicken in a little oil until nearly cooked remove. Build the sauce (aromatics + toasted paste/powder + coconut milk/broth) then simmer chicken in the sauce until it reaches 165°F/74°C.
- Oven: Toss chicken in oil/marinade spread on a sheet pan roast at 400°F/205°C until 165°F/74°C, then fold into the simmered sauce.
Can I make this vegetarian or vegan?
Yes. Swap chicken for firm tofu, chickpeas, cauliflower or mixed veggies. Use vegetable broth and confirm your curry paste is plant-based. Keep the same sauce method for full flavor.
Can I make this recipe ahead of time?
Marinate the chicken up to 24 hours ahead. The sauce base can be cooked 1-2 days in advance reheat gently and add the freshly air-fried (or reheated) protein just before serving.
What’s the best way to store leftovers?
Cool quickly then refrigerate in an airtight container for 3-4 days. For longer storage see freezing guidance below.
How can I achieve a richer coconut flavor?
Use full-fat coconut milk simmer to reduce finish with 1-2 Tbsp coconut cream and garnish with toasted coconut flakes for aroma and crunch.
Chef Call-Outs: Jonathan Miller recommends tasting and salting the sauce after it reduces (to avoid oversalting). Emily Rodriguez suggests a final squeeze of lime to balance richness. Edited for clarity by Ruby.
Elevate Your Meal: Serving Suggestions & Beyond
Classic Pairings
- Jasmine rice (fluffy and aromatic), brown rice or quinoa for a nutty higher-fiber option.
Bread Options
- Warm naan, roti or pita perfect for scooping every drop of sauce.
Vegetable Sides
- Lightly steamed green beans, roasted broccoli, sautéed spinach or a cucumber-tomato salad for brightness and crunch.
Garnishes (Expert Tips)
- Fresh cilantro a squeeze of lime and toasted coconut flakes for freshness and texture.
- Sliced red chilies add color and adjustable heat.
Storage & Reheating Instructions: Savoring Leftovers
Refrigeration
- Store curry in an airtight container in the fridge for 3-4 days.
Freezing
- Freeze chicken and sauce (together or separately) for 2-3 months. Thaw overnight in the refrigerator before reheating.
Reheating
- Stovetop: Warm gently over medium-low stirring. If the sauce thickened in the fridge add a splash of water or broth to loosen.
- Microwave: Heat in short intervals stirring between bursts for even warming.
Food-Safety Reminder
- Reheat leftovers to an internal temperature of 165°F/74°C.
- Avoid repeated reheating portion before storing.
Pro Note from Jonathan Miller: Add a teaspoon of coconut cream during reheating to restore silkiness.
Pro Note from Emily Rodriguez: Revive aromatics with a quick stir-in of fresh cilantro and a squeeze of lime just before serving.
Unleash Your Inner Chef: Customizing Your Curry Adventure
Dial the flavor to your mood. Use these dials as add-ons to your base recipe taste and adjust in small increments.
Flavor Profile Selection
- Spicy & Bold: +½-1 tsp red chili powder add 1-2 sliced bird’s eye chilies optional pinch of cayenne at the simmer stage.
- Aromatic & Earthy: +½ tsp ground cumin + ½ tsp ground coriander finish with ¼-½ tsp garam masala off-heat for warm aroma.
- Tangy & Bright: +1-2 tsp extra fresh lime juice optional ½-1 tsp tamarind paste for deeper sour notes balance with a touch of sweetener.
- Sweet & Mild: Reduce chili by half +1-2 tsp brown sugar or +1 Tbsp coconut cream near the end for a round gentle finish.
Suggested Ratios for Regional Profiles
- Thai-Inspired: 2-3 Tbsp red/green curry paste + 1 tsp minced lemongrass + ½ tsp grated galangal finish with 1-2 tsp lime juice and 1-2 tsp fish sauce.
- Indian-Inspired: 1 Tbsp Madras curry powder + ½ tsp turmeric + ½ tsp grated ginger + ¼ tsp cardamom finish with ¼-½ tsp garam masala off-heat.
- Malaysian-Inspired: 1-2 Tbsp curry paste + ½ tsp turmeric + 1 tsp minced lemongrass use a slightly richer coconut cream base (add 1-2 Tbsp at the end).
Experiment with Add-Ins (Mix & Match)
- Vegetables: bell peppers (thin strips) baby spinach (stir in at the end) par-cooked potatoes or sweet potatoes (½-inch cubes) green beans.
- Legumes: chickpeas (drained), red lentils (pre-cooked or simmered separately).
- Proteins: shrimp (air-fry briefly until just opaque), firm tofu (pressed, cubed, air-fried for texture).
- Finishing boosts: toasted coconut flakes fresh cilantro thinly sliced red chilies.
Chef Guidance: Jonathan Miller recommends seasoning in layers marinade post-air-fry pinch of salt final taste-check in the sauce. Emily Rodriguez suggests finishing each profile with a balancing trio salt acid (lime) and a touch of sweetness when needed. Curated for home kitchens by Ruby.
Conclusion: Your New Favorite Air Fryer Masterpiece
You’ve built a juicy, flavor-forward coconut curry chicken with reliable air-fryer timing smart food-safety checks (165°F/74°C) and a customizable spice roadmap. Faster weeknights no dry chicken and delicious crescent rolls pizza stuffing.
Try the base recipe once then run a curry adventure next time Thai heat Indian warmth or Malaysian richness. Share your version and favorite add-ins in the comments so others can riff on your success.
Don’t hesitate to tune the dials nudge heat up or down swap veggies with what’s in your crisper and adjust thickness by simmering or a light slurry. As Jonathan Miller says Taste early, taste often. And per Emily Rodriguez finish with acid and herbs for a bright confident plate. Editorial polish and home-cook notes by Ruby.
