The Best Fluffy Pancakes recipe you will fall in love with. Full of tips and tricks to help you make the best pancakes.
Air fryer racks allow you to increase cooking capacity, improve heat circulation and prepare multiple foods at once making your air fryer far more efficient. When used correctly they help produce evenly cooked meals with crisp textures while saving time during busy cooking sessions.
Many home cooks run into the same limitations with a standard air fryer basket. Cooking often happens in a single layer which means preparing one batch at a time. During recipe testing in my kitchen, I noticed that this can slow things down especially when making full meals or larger portions. It can also lead to uneven browning if food is stacked too closely together.
A well-designed air fryer rack solves several of these challenges. By creating additional cooking levels inside the basket or air fryer oven racks allow hot air to circulate around more food at once. This not only increases capacity but also helps maintain the crisp textures that make air frying so appealing.
When I started testing racks regularly the difference was noticeable. I could cook vegetables on one level while crisping proteins on another reducing the need for multiple batches. The improved airflow also helped produce more consistent browning across different foods.
Professional cooking techniques reviewed with contributing chefs highlight the same advantage. Racks expand the usable cooking space inside the air fryer while preserving airflow which is essential for achieving even cooking results.
In this guide, you’ll learn how to use air fryer racks correctly when they improve results and how they can help you cook faster while maintaining crisp textures and balanced cooking. By the end, you’ll have practical methods to make your air fryer more versatile and efficient in everyday home cooking.
Why Racks Are a Game-Changer: Core Benefits for Every Air Fryer User
Air fryer racks increase cooking capacity by adding multiple vertical cooking levels allowing you to prepare more food at once while maintaining the airflow needed for crisp results.
When used properly, racks turn a single-layer basket into a multi-level cooking space. During testing in my kitchen, I found that this simple accessory can make a noticeable difference in both efficiency and cooking consistency.
Increased Cooking Capacity
One of the biggest advantages of an air fryer rack is the ability to cook larger portions in a single session.
Instead of placing everything in a single crowded layer racks allow you to stack food vertically. This creates extra cooking space while still leaving room for hot air to circulate.
This is particularly useful when preparing:
- Proteins and vegetables together
- Multiple servings of snacks or appetizers
- Batch cooking for families or meal prep
In practical terms, this means fewer cooking rounds. Instead of waiting for a second or third batch you can complete more of the meal in one cycle.
During testing, racks proved especially helpful when preparing full dinners. I could cook vegetables on one level while crisping proteins on another which made the entire process faster and more efficient.
Professional cooking techniques reviewed with contributing chefs often emphasize this type of vertical cooking setup. By using the full height of the air fryer you maximize capacity without sacrificing performance.
More Even Cooking Results
Another major benefit of racks is improved exposure to circulating hot air.
When food sits directly in the basket some surfaces may have limited airflow. Elevating food on a rack allows heat to move more freely around it which helps prevent soggy spots and encourages even browning.
Foods that benefit from this improved airflow include:
- Breaded items like carrot croquettes with parmesan cheese
- Chicken wings
- Roasted vegetables
- Snack foods that need crisp edges
In my testing, elevating food slightly above the basket often improved the texture of breaded foods and vegetables. More air could reach the underside which helped create a more balanced crispness.
This small adjustment can make air-fried foods feel closer to oven-roasted or lightly fried results.
Strategic Food Placement
Even when using racks spacing still matters.
For the best cooking results:
- Arrange food in a single layer on each rack level
- Leave space between pieces whenever possible
- Avoid stacking items directly on top of each other
If racks are overloaded airflow becomes restricted and crispness may suffer.
A light evenly spaced layout allows hot air to circulate around each piece of food. This helps ensure consistent cooking across all levels of the rack.


Ability to Multitask & Cook Full Meals
Air fryer racks make it possible to cook multiple foods at the same time on separate levels which greatly improves efficiency without mixing flavors.
In my testing, multi-layer racks made it much easier to prepare complete meals in one cooking cycle. Instead of cooking protein first and then running a second batch for vegetables or sides both can cook together while still receiving proper airflow.
This setup works because each rack level creates its own cooking zone. Hot air continues circulating around every layer, allowing different foods to cook simultaneously while maintaining their individual textures.
Practical Food Pairing Tips
To get the best results when cooking multiple foods at once placement matters.
- Place proteins on the top rack. Natural juices drip downward and are less likely to affect crispness.
- Position vegetables or starches like air fryer stuffed mushrooms on the lower rack. These foods tolerate extra heat well and benefit from the slightly stronger airflow near the basket base.
- Keep stronger flavors above delicate foods. This helps maintain balanced flavor without overpowering lighter ingredients.
This approach can significantly streamline weeknight cooking. Preparing a protein and side dish in one cycle saves time and reduces the need for repeated cooking batches.
Healthier Oil-Free Cooking
Air fryer racks also support healthier cooking methods by improving air circulation around the food.
When food is elevated above the basket surface hot air can move freely underneath it. This helps moisture evaporate instead of collecting under the food which encourages crisp textures without relying on large amounts of oil.
In my kitchen tests racks worked particularly well for recipes such as:
- Oil-free chicken, air fried chicken nuggets or poultry dishes
- Breaded chicken nuggets
- Crispy vegetables
- Lower-fat snack foods
Elevating the food also allows excess fat to drip away during cooking which can help produce cleaner textures and lighter meals.
Professional cooking techniques reviewed with contributing chefs often recommend racks for cooks who want crisp results with minimal oil. The elevated design naturally encourages airflow and reduces grease buildup.
Enhanced Cooking Versatility
Using specialized racks can also expand what your air fryer can do. Once racks are added the appliance functions more like a compact multi-purpose oven capable of handling a wider range of cooking methods including crispy breakfast pies:
Some of the most useful rack types include:
- Dehydrator Racks:
These thin multi-level racks are useful for preparing fruit chips, jerky and vegetable crisps like zucchini parmesan chips.. Because they maximize airflow across several layers they help ingredients dry evenly. - Skewer Racks:
Designed to hold skewers upright these racks allow you to cook kabobs grilled-style vegetables or small cuts of meat while keeping them evenly spaced. - Baking Racks:
Flat racks provide support for small baking dishes, cookies, pastries and mini casseroles such as air fried casserole with turkey inside the air fryer.
With the right rack setup an air fryer becomes capable of handling tasks normally reserved for an oven, grill or dehydrator. As you experiment with different rack styles it becomes easier to prepare a wider range of meals using the same appliance.


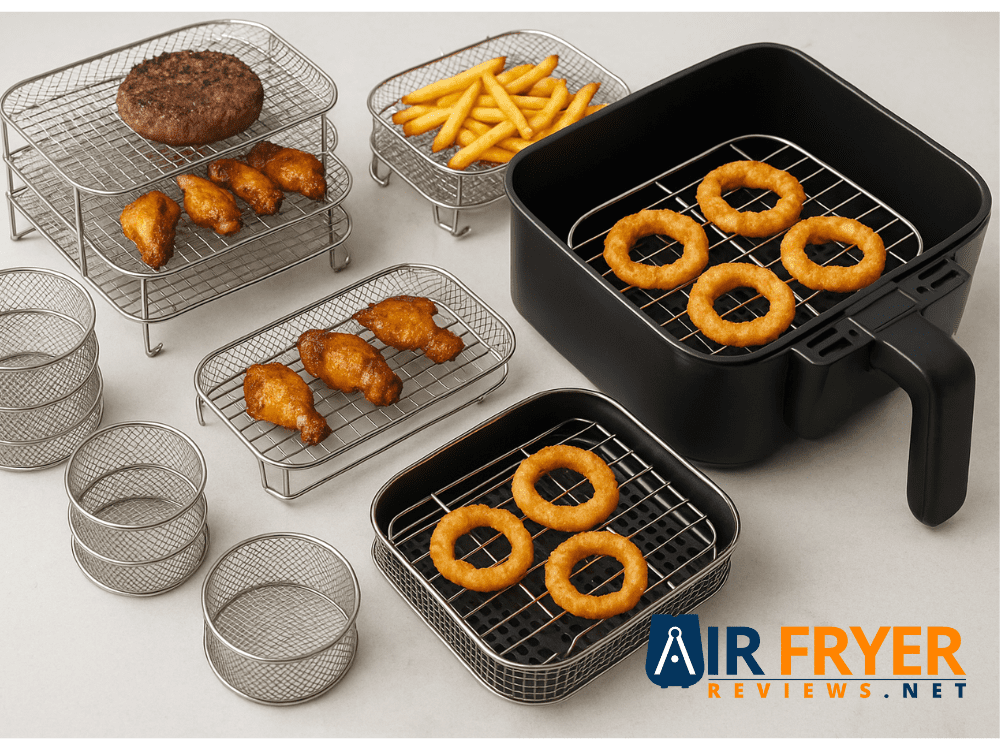
Your Guide to Air Fryer Racks: Types, Materials and Their Best Uses
Air fryer racks come in several designs each built to support a different cooking method. Choosing the right type can expand your air fryer’s capabilities while helping you cook more efficiently.
During testing in my kitchen, I found that certain racks work better for specific tasks. Some increase cooking capacity while others are designed for dehydration, grilling-style cooking or improving airflow around foods that need even browning.
Below are the most common rack types and when to use them.
Stackable Racks (Multi-Layer Racks)
Stackable racks usually include two or three tiers that fit directly inside the air fryer basket. Each level creates an additional cooking surface allowing you to prepare more food during a single cooking cycle.
These racks are ideal for:
- Cooking larger portions
- Preparing multiple foods at once
- Batch cooking or family meals
In my testing, stackable racks worked particularly well when cooking proteins and vegetables together. The vertical layers increased capacity while still allowing hot air to circulate between levels.
Professional cooking techniques reviewed with contributing chefs often highlight multi-layer cooking as a practical way to maximize efficiency in smaller appliances. By using vertical space instead of crowding the basket, you maintain better airflow and more consistent results.
Best for: Families, Batch cooking and Full-meal preparation.
Dehydrator Racks
Dehydrator racks are usually thin, fine-mesh trays designed to support low-temperature cooking and steady airflow.
They are commonly used for:
- Fruit chips and dried fruit
- Beef jerky
- Herbs and vegetable crisps
- Healthy snack preparation
Because these racks spread food across multiple layers with minimal obstruction they help ingredients dry evenly without trapping moisture.
In my kitchen tests, dehydrator racks worked especially well when making thin vegetable chips. The mesh surface allowed air to circulate across the entire ingredient producing more consistent drying compared to a solid tray.
These racks effectively turn an air fryer into a compact dehydrator expanding its usefulness for snack preparation and food preservation.
Best for: Healthy snacks, Dried ingredients and Dehydration-style cooking.
Skewer Racks (with Skewers)
Skewer racks are designed to hold metal skewers either horizontally or vertically depending on the rack model.
They are commonly used for:
- Kabobs and grilled-style meats
- Vegetable skewers
- Small cuts of chicken or beef
- Satay-style dishes
The rack keeps skewers evenly spaced so hot air can circulate around each piece of food.
During testing, skewers positioned on racks produced a result similar to grilling. Because air reaches every side of the food the surface browns evenly without needing constant flipping.
Practical tip: Vertical skewer racks can free up additional basket space while exposing all sides of the food to circulating heat.
Best for: grilled-style dishes and evenly cooked skewered foods.
Baking or Roasting Racks (with Feet)
These racks are usually single elevated platforms with small feet designed to lift food above the basket surface.
They are particularly useful for:
- Roasting meats like an air fryer chicken roast and poultry
- Crisping chicken wings
- Roasting vegetables
- Supporting small baking dishes
Elevating food allows hot air to circulate underneath it which helps prevent the underside from becoming soft or unevenly cooked.
When testing roasting racks I noticed that lifting food slightly above the basket often improved overall crispness. The added airflow underneath the food helped produce more uniform browning across all sides.
This type of rack is often recommended for beginners because it immediately improves airflow without requiring complicated multi-layer setups.
Best for: Roasting, Crisping and improving airflow around foods that need even browning.


Rack Materials & What to Consider
The material of your air fryer rack affects durability, heat performance and how easy it is to maintain. When I started testing different rack styles the material often made just as much difference as the rack design itself.
Choosing the right material ensures the rack can handle high temperatures while still supporting the type of food you cook most often.
Stainless Steel
Stainless steel is the most common and reliable material used for air fryer racks.
Key Benefits
- Highly durable and resistant to warping
- Handles high temperatures easily
- Simple to clean and maintain
- Suitable for frequent cooking
In my experience, stainless steel racks perform consistently across different recipes. They maintain structure under heat and support strong airflow which helps preserve the crisp textures air fryers are known for.
Because of their durability stainless steel racks are usually the best option for multi-layer racks and everyday cooking.
Non-Stick Coated Racks
Non-stick coated racks are designed to prevent food from sticking to the surface.
They work well for foods such as:
- Fish fillets
- Pastries and baked goods
- Thin vegetables
- Delicate breaded items
However, non-stick coatings require more careful handling. Scratching the surface can reduce their effectiveness over time.
When choosing a non-stick rack always confirm that the coating is rated for the high temperatures used in air fryers.
Silicone Components
Silicone accessories are often used alongside racks in the form of baking mats or flexible inserts.
These are helpful when cooking:
- Muffins or small baked goods
- Soft pastries
- Sticky batters or dough-based foods
Food-grade silicone is heat resistant and naturally non-stick which makes it useful for baking tasks. It can also help reduce the need for added oil.
However, silicone should usually complement a rack rather than replace it since solid silicone surfaces can slightly reduce airflow.
Silicone Mats or Liners
Silicone mats are made from food-grade silicone and are designed to prevent sticking and simplify cleanup.
They are especially useful for sticky marinades or delicate foods that might otherwise stick to the rack surface.
Silicone liners work in both basket-style and oven-style air fryers provided they are properly sized and heat-resistant.
Final Considerations When Choosing a Rack
When selecting an air fryer rack focus on three key factors:
- Durability – choose materials that can handle repeated high-heat cooking
- Heat safety – confirm that coatings and materials are air fryer compatible
- Proper fit – ensure the rack matches your air fryer’s basket or oven dimensions
During testing, I’ve found that racks work best when they match both the appliance design and the cooking style of the user. Some cooks prioritize large batch meals while others want tools for baking, grilling-style dishes or dehydrated snacks.


Mastering Multi-Level Cooking: Step-by-Step Installation & Advanced Techniques
Multi-level cooking is one of the most valuable advantages of using air fryer racks. By creating multiple cooking levels you can prepare larger portions and even complete meals in a single cycle while maintaining consistent airflow.
When I started testing multi-layer racks regularly the biggest improvement was efficiency. Cooking proteins and vegetables at the same time reduced the need for multiple batches while proper rack placement helped maintain even browning across different foods.
The steps below provide a simple system for installing and using air fryer racks effectively.
Step-by-Step: How to Install and Position Air Fryer Racks
1. Preparation
Before installing racks make sure both the air fryer basket and racks are clean and completely dry.
Leftover oil, crumbs or residue can interfere with airflow and may cause uneven cooking or smoking. During recipe testing, I’ve found that starting with a clean rack setup helps maintain consistent results across multiple cooking sessions.
2. Preheating with the Rack Installed
Preheat the air fryer with the racks already inside the basket.
Allowing the rack to heat along with the air fryer helps it reach the same temperature as the basket surface. This can improve the initial cooking performance for foods that benefit from quick surface browning.
In my testing, preheating the rack made a noticeable difference for foods like:
- Chicken pieces
- Roasted vegetables
- Protein cuts that need a crisp exterior
The heated rack helps start the cooking process immediately once food is placed inside.
3. Loading the Bottom Rack
Place heavier foods or ingredients that require longer cooking times on the lowest rack.
Common examples include:
- Chicken thighs
- Root vegetables such as potatoes and carrots
- Thicker cuts of meat
The lower position typically receives slightly stronger heat exposure. This helps denser foods cook thoroughly while the upper racks handle quicker cooking ingredients.
4. Adding Additional Rack Layers
If you are using a multi-layer rack carefully stack the remaining tiers on top.
Make sure that:
- Each rack sits securely on its supports
- The structure remains level and stable
- The layers leave enough vertical space for airflow
Rack stability is important especially if you plan to shake or rotate food during cooking. A stable setup prevents food from shifting between layers.
5. Strategic Food Placement
Even with multiple racks proper spacing remains essential.
For the best results:
- Leave small gaps between pieces of food
- Avoid stacking items directly on top of each other
- Distribute food evenly across each rack level
A practical approach that works well in my kitchen is to use the top rack for foods that cook faster or need stronger crisping such as wings or vegetables. Meanwhile, heavier or slower-cooking foods stay on the lower level.
Advanced Techniques for Multi-Rack Cooking
Once you’re comfortable installing and positioning air fryer racks a few advanced techniques can help you achieve more consistent results across multiple layers. During testing in my kitchen small adjustments especially with timing and rack placement made a noticeable difference when cooking full meals.
These techniques focus on maintaining airflow balancing heat between tiers and ensuring each layer cooks evenly.
Temperature and Time Adjustments
When cooking with multiple rack levels or new accessories small timing adjustments are often necessary.
Because heat naturally rises inside the air fryer chamber the top rack may cook slightly faster than the lower levels. Instead of increasing the temperature it’s usually better to make small changes to the cooking time.
Practical guidelines that work well during testing include:
- Foods on the top rack may crisp more quickly
- Foods on the lower rack may need an additional 2-5 minutes
- Extend cooking time slightly rather than raising the temperature
When preparing proteins or thicker foods checking doneness halfway through the cooking process helps maintain accuracy and prevents overcooking.
Rotation and Rack Swapping
Rotating rack positions during cooking helps balance small temperature differences between layers.
In my tests with multi-layer racks, swapping rack positions halfway through cooking often produced more even browning across all tiers.
A simple rotation method works well:
- Halfway through cooking move the top rack to the bottom and the bottom rack to the top
- If using three levels shift each rack up or down by one position
- Rotate individual food pieces if they cook unevenly
This method is especially useful when cooking foods that require consistent crispness such as wings, roasted vegetables or breaded items.
Preventing Flavor Transfer
When cooking different foods on separate rack levels proper placement helps prevent flavors from mixing.
For the best results:
- Keep savory foods such as meats and vegetables together
- Cook sweet foods like fruit chips or pastries on a separate rack
- Use liners when necessary to prevent sauces or juices from dripping
Perforated parchment liners or silicone mats can help protect lower layers while still allowing airflow to circulate through the rack.
These accessories are particularly helpful when cooking marinated proteins or delicate foods that may release moisture or sticky sauces during cooking.
Combo Cooking Strategies
One of the biggest advantages of air fryer racks is the ability to cook multiple meal components at the same time.
When testing multi-layer setups pairing a protein with a quick-cooking side dish often produced the most efficient results.
Some effective combinations include:
- Chicken wings with roasted vegetables
- Salmon with asparagus
- Pork chops with Brussels sprouts
- Tofu with stir-fry vegetables
- Shrimp with garlic green beans
- Our Super Fast Glazed Salmon Dijon Mustard
This approach turns the air fryer into a practical meal-prep tool allowing you to prepare a full dinner in a single cooking cycle.
Why Multi-Rack Cooking Matters
Batch cooking and multi-level preparation highlight the true potential of air fryer racks. Instead of functioning as a single-layer basket appliance the air fryer becomes a compact cooking system capable of handling several foods simultaneously.
Solving Common Air Frying Frustrations with Racks
Even experienced home cooks run into a few common air fryer challenges limited basket space uneven crisping or messy cleanup. During recipe testing in my kitchen racks consistently solved several of these issues by improving airflow and expanding cooking capacity.
Below are some of the most common air fryer frustrations and how the right rack setup can address them.
Problem: Limited Cooking Capacity
Solution: Use stackable multi-layer air fryer racks.
Stackable racks multiply the usable cooking space inside the basket by adding vertical layers. Instead of cooking in repeated batches you can prepare larger portions or multiple foods at once.
For example you might cook:
- Chicken or protein on one layer
- Vegetables or potatoes on another
- Small snacks or side dishes on an additional rack

This vertical setup helps maintain airflow while dramatically increasing cooking capacity. It’s especially helpful in small kitchens where maximizing cooking efficiency matters.
Problem: Uneven Cooking or Soggy Results
Solution: Elevate food using roasting or baking racks.
When food sits directly on the basket floor the underside may receive less airflow. Elevating food on a rack allows hot air to circulate around it from all directions.
This often results in:
- More even browning
- Better crisping on all sides
- Reduced soggy spots
During testing, even simple foods like fries and vegetables crisped more evenly when raised slightly above the basket surface.
For multi-rack cooking rotating rack positions halfway through cooking can further improve consistency.
Problem: Difficulty Cooking Multiple Foods at Once
Solution: Use multi-level racks to separate foods into tiers.
Cooking several items simultaneously becomes much easier when each ingredient has its own rack level. This allows different foods to cook without crowding the basket.
A simple setup might include:
- Chicken wings on the top rack
- Potatoes or vegetables on the lower rack
- Delicate items placed on a liner or silicone mat if needed
This arrangement makes it possible to prepare complete meals in one cooking cycle reducing both cooking time and effort.
Problem: Messy Cleanup from Stuck-On Food
Solution: Use drip trays or protective liners.
Greasy foods and marinades can leave residue on racks and baskets. Placing a small heat-safe dish foil sheet or drip tray beneath foods that release juices helps catch drips before they burn onto the basket.
Additional tools that can simplify cleanup include:
- Perforated parchment liners
- Silicone mats designed for air fryers
These accessories help prevent sticking while still allowing hot air to circulate through the rack.
Problem: Not Knowing Which Rack to Use
Solution: Match the rack type to the cooking goal.
Different racks are designed for specific tasks:
- Stackable racks for batch cooking and full meals
- Dehydrator racks for dried fruits, herbs and snacks
- Skewer racks for grilled-style meats and vegetables
- Roasting racks for improving airflow and crisping
Selecting the appropriate rack for the recipe can make cooking more predictable and efficient.
Problem: Preparing Complete Meals Efficiently
Solution: Use the “full meal in one” air fryer method.
One of the most practical uses for racks is preparing a full meal in a single cooking cycle. By placing proteins, vegetables and sides on separate levels the air fryer functions more like a compact oven.
In my kitchen tests, this approach reduced overall cooking time while maintaining crisp textures across different foods.
Why Racks Matter for Small Kitchens
For cooks working with limited space air fryer racks can make a significant difference. Expanding vertical cooking capacity allows a compact appliance to handle larger meals without requiring additional equipment.
This makes racks especially useful in:
- Apartment kitchens
- Dorm rooms
- RV kitchens
- Small countertop cooking setups

By turning a single basket into a multi-level cooking system racks help unlock the full potential of the air fryer while keeping the cooking process efficient and organized.
Personal Air Frying Transformations: My Rack Journey to Culinary Confidence
For a long time, I believed I already understood how to get the most out of my air fryer. It handled quick meals, crisped food reliably and made weeknight cooking easier. But once I started experimenting with air fryer racks, I realized how much more the appliance could actually do.
The change didn’t happen overnight. It came through small discoveries in my kitchen moments where a simple rack solved a problem I had been working around for months. Those experiences gradually reshaped how I cook today.
As Ruby, the person testing and developing these recipes I want to share a few of those turning points because they show how racks can transform everyday air fryer cooking.
From Too Many Batches to Just One: The Chicken Wing Breakthrough
One of my earliest frustrations was making chicken wings for family movie nights. A single basket meant cooking batch after batch and by the time the final wings were ready the first batch had already cooled.
That changed when I tested a multi-layer air fryer rack.
Instead of crowding everything into one layer I arranged wings across two rack levels. The vertical setup doubled the cooking capacity while still allowing hot air to circulate around each piece.
The results were exactly what I had hoped for:
- Even browning on every wing
- Crisp skin without overcrowding
- A full batch ready at the same time
It was a simple adjustment but it made the air fryer feel far more capable. That was the moment I started treating racks as a regular part of my cooking setup rather than an occasional accessory.
Discovering Healthier Snacking With Dehydrator Racks
Another unexpected discovery came when I began testing dehydrator-style racks.
At first, I tried them with thin apple slices. Spreading the slices across multiple mesh layers allowed gentle airflow to remove moisture gradually. The result was lightly crisp apple chips without added sugar or oil.
From there I started experimenting with:
- Strawberries
- Mango strips
- Pear slices with cinnamon
Because the racks allowed air to circulate across several layers at once the fruit dried evenly without needing a separate dehydrator.
These snacks quickly became popular at home. The kids enjoyed them and I appreciated having a healthier alternative to packaged snacks. What surprised me most was that the same air fryer I once used mostly for fries was now producing fruit chips and other light snacks with very little effort.
The Weeknight “Aha!” Moment: A Full Meal in One Cycle
One busy weeknight, I decided to try something different. I placed salmon fillets on the top rack and arranged asparagus on the rack below. At the time, I expected the results to be uneven or that one item would finish much earlier than the other.
Instead, both foods finished cooking at nearly the same time.
The salmon developed a crisp exterior while staying tender inside and the asparagus roasted evenly underneath. What stood out most was the efficiency the entire meal finished before my oven would have even finished preheating.
That experiment introduced me to what I now think of as the “full meal in one air fryer” approach. By using racks to separate ingredients vertically proteins and sides can cook together without overcrowding the basket.
Since then, this method has become part of my regular weeknight routine. Preparing a protein on one rack and vegetables on another simplifies dinner and reduces the need for multiple pans or appliances.
Professional cooking techniques reviewed with contributing chefs often highlight this same strategy because it makes air fryers far more practical for everyday meals.
How These Small Wins Built Real Cooking Confidence
The benefits of using racks went beyond convenience. Over time, these small improvements changed how I approached air fryer cooking.
Using racks regularly helped me:
- Cook larger portions without sacrificing crisp texture
- Prepare meals with less added oil
- Develop simple meal prep routines
- Experiment with new cooking methods inside the air fryer
- Adjust cooking times confidently based on rack placement
- Reduce cleanup and stress during busy weeknights
Each successful experiment made the air fryer feel more like a versatile cooking tool rather than just a quick snack appliance.
That’s why I encourage home cooks to explore air fryer racks not only for efficiency but for the flexibility and confidence they bring to everyday cooking.
A Simple Before-and-After Example
One of the clearest improvements appears when cooking foods that normally sit directly in the basket.
Before Using a Rack
- Wings crowded in the basket
- Uneven airflow
- Pale spots and inconsistent crisping
After Using a Rack
- Wings elevated above the basket
- Hot air circulating around all sides
- Even golden color and crisp texture
- Larger portions cooked in a single batch
Small adjustments like elevating food on a rack can dramatically improve airflow. Once you see the difference in texture and efficiency racks quickly become one of the most useful accessories for everyday air fryer cooking.
Maintaining Your Racks: Cleaning, Safety and Longevity Tips
Proper care helps air fryer racks perform consistently while extending their lifespan. During regular testing in my kitchen, I’ve found that clean racks not only cook more evenly but also prevent smoke, sticking and unwanted flavors from previous meals.
Maintaining racks doesn’t require complicated routines. A few simple habits cleaning promptly storing them properly and checking for wear can keep them working reliably for years.
Cleaning and Maintaining Your Air Fryer Racks for Longevity
Immediate Soaking After Cooking
One of the easiest ways to simplify cleaning is to soak racks shortly after cooking.
Warm water helps loosen oils and food particles before they harden. This is especially useful after preparing foods with sticky marinades, sauces or breaded coatings.
In my kitchen, placing racks in warm soapy water for a few minutes while the air fryer cools down usually removes most residue before scrubbing is even needed.
Choosing the Right Cleaning Method
Different rack materials benefit from slightly different cleaning approaches.
Dishwasher vs. Hand Washing
- Stainless steel racks are usually dishwasher-safe and handle high temperatures well.
- Non-stick coated racks should be washed by hand using a soft sponge to avoid damaging the coating.
- Silicone liners or mats can often be placed in the dishwasher if they are labeled dishwasher-safe.
When in doubt checking the manufacturer’s cleaning instructions helps protect the rack’s finish and structure.
Removing Stubborn Residue
Occasionally grease or food particles may stick more firmly to rack surfaces.
A simple cleaning process usually works well:
- Soak the rack in hot soapy water for 15-30 minutes.
- Use a non-abrasive sponge or cloth to remove loosened residue.
- For mesh or grate-style racks a soft cleaning brush can help remove trapped food.
Avoid metal scrubbers or abrasive cleaners since they may scratch stainless steel surfaces or damage non-stick coatings.
Proper Drying and Storage
After cleaning, racks should always be dried completely before storing.
Allowing moisture to remain on metal surfaces can lead to rust or discoloration over time. Drying with a towel or letting racks air-dry fully helps prevent this.
For storage, it’s best to keep racks:
- In a cool, dry cabinet or
- Near the air fryer so they’re easy to access during cooking
Keeping racks stored neatly also prevents bending or accidental damage.
Regular Safety Inspection
Occasional inspection ensures racks remain safe to use.
Look for signs such as:
- Warping or uneven surfaces
- Flaking non-stick coatings
- Rust or corrosion
- Bent rack legs or unstable supports
If a rack shows significant damage replacing it is the safest option. A stable rack ensures food stays properly positioned and airflow remains consistent during cooking.
Safety Considerations When Using Air Fryer Racks
Air fryer racks are simple to use but safe handling and proper placement are important. During recipe testing, I’ve found that most problems with racks come from overcrowding incorrect accessories or improper handling when the racks are hot.
Following a few safety guidelines ensures the racks perform well and your air fryer continues operating safely.
Heat Resistance
Always use racks that are specifically designed for air fryers and rated for high cooking temperatures.
Not all oven accessories are suitable for air fryer use. Materials must be able to handle the rapid airflow and heat levels common in air fryer cooking.
Before using any new rack or accessory check your air fryer manual. Manufacturers often provide guidance on compatible accessories and maximum temperature limits.
Proper Loading
Overloading racks can affect both airflow and rack stability.
For safe and consistent cooking:
- Avoid placing too much weight on a single rack level
- Distribute food evenly across the rack surface
- Make sure each rack sits securely in its supports
Balanced loading allows hot air to circulate freely while preventing racks from shifting during cooking.
Safe Handling of Hot Racks and Food
Air fryer racks heat up quickly and remain hot for several minutes after cooking.
To prevent burns:
- Use heat-resistant gloves or oven mitts when removing racks
- Avoid touching racks with bare hands even briefly
- Use heat-safe tongs or silicone tools to adjust food if needed
These tools make it easier to remove food or reposition racks safely when cooking with multi-level setups.
Placement and Clearance
Proper rack placement is essential for maintaining airflow inside the air fryer.
Before starting a cooking cycle:
- Ensure racks do not touch the heating element
- Confirm they do not block the internal fan or airflow vents
- Leave enough space above the rack for circulating air
Maintaining clear airflow helps prevent overheating and ensures the appliance cooks food evenly.
Conclusion: Elevate Your Air Frying Experience
Air fryer racks can significantly expand what your appliance is capable of doing. By adding vertical cooking space, they allow you to prepare larger portions cook multiple foods at once and achieve more even crisping.
In my own kitchen testing, racks quickly became one of the most useful accessories. They made it easier to prepare full meals in a single cycle experiment with new cooking techniques and reduce the number of batches needed for larger portions.
Throughout this guide, you’ve seen how simple changes such as rack placement, multi-level cooking and thoughtful food arrangement can improve both efficiency and cooking results. These methods combine practical experience from everyday air fryer use with professional cooking techniques reviewed with contributing chefs.
As you continue experimenting try different rack styles adjust placement based on the foods you cook most often and build a setup that fits your routine. Small improvements in airflow and cooking organization can make a noticeable difference in both texture and convenience.
With the right rack setup your air fryer becomes far more than a basic basket appliance. It turns into a compact cooking system capable of handling everything from quick snacks to complete multi-component meals.
